

No Assembly (or C#, or VB) Required
Searching Twitter from SharePoint has become all the rage since I originally posted my Twitter Search Federation articles (Part 1, Part 2). Federation is great if you have Search Server, or the Infrastructure Updates. But what if you are only using WSS? Or what if you just want to drop a Twitter search into any old SharePoint page, rather than a full Results page? And more critical – what if you don’t have direct access to the SharePoint server in order to install binary web part and feature – with or without a Solution Package (WSP)?
Well, buried in Part 2 of my article was the the solution. A Data View Web Part (DVWP) that displays the results of a twitter search. In the original article, that DVWP was just an interim step on the way to Federation. For this article, a form of that web part is the actual goal. So, I’m going to start by re-using the DVWP section of the Federation article – with a tweak or two :). But then, I’ll also show you how do two very important things – connect the web part to an input form (or any other web part), and export it for use on other SharePoint sites.
Note: You can find a link to download the Twitter Search Results Web Part at the end if this article.
A Data View Refresher
The Data View Web Part is a way to display information from virtually any source within SharePoint. Data Views are created in SharePoint Designer, in association with another feature called the Data Source Library. This is not to be confused with the "Business Data Catalog", or BDC. While both the Data Source Library and the BDC deal with presenting data from external sources within SharePoint, the BDC is a part of MOSS Enterprise, and allows a much deeper integration of the data with various aspects of SharePoint. The Data Source Library, on the other hand, is available in all editions of SharePoint – from WSS on up – and is primarily used to generate Data View/Data Form Web Parts.
Data Views and the Data Source Library are a very powerful combination – so much so that almost two whole chapters of my book are devoted to them. Obviously, I can’t go into that kind of detail here, but while this particular example is fairly simple, it covers a lot of ground.
The link between Federation and Data Views is pretty close. In fact, prior to Search Server or the Infrastructure Updates, you could use a Data View to achieve very similar results. We’re going to take advantage of this by building the look we want in a Data View, then transferring it into the Federated Location definition.
Creating a Data View
Before we can create a Data View, we need create a new item in the Data Source Library for our Atom feed.
To do this, Select "Manage Data Sources…" from the Data View menu in SharePoint Designer to summon the Data Source Library task pane. Atom and RSS feeds fall into the category of "Server-side Scripts" that return XML, so expand the Server-side Scripts section and click "Connect to a script or RSS Feed." You will see the dialog below. Fill in the URL with the same Twitter Atom query we have been using: http://search.twitter.com/search.atom?q=sharepoint (See Part 1 of the original article for details on how this was derived.)
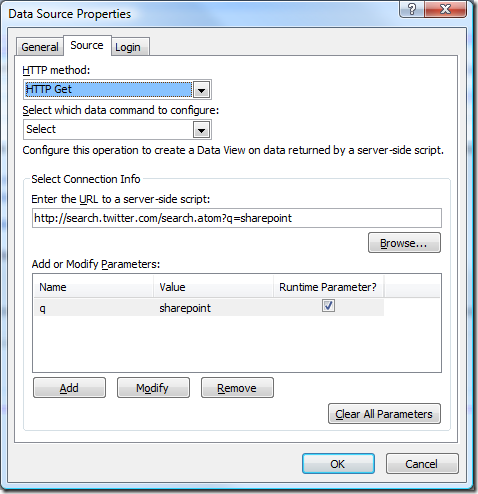
The query parameter (q) will automatically be passed into the list as soon as you change the focus from the URL field. "SharePoint" will become the default parameter value, and give us something to see as we customize the look. If you are following along, you can replace "SharePoint" with any default query term that might be appropriate to your environment. Make sure the Runtime Parameter box is checked, otherwise you can’t change the query later.
Now that we have the Data Source, we need a place to put it. This can be any web part page. While you can use the results page if you feel so inclined, because we aren’t going to be using the Data View directly, it doesn’t need to be.
Once you have a web part page open, select a Web Part Zone, and then pick "Insert Data View…" from the Data View menu. The Data Source you created above will have a drop-down menu associated with it. Select "Show Data".

You will see the Data Source Details task pane, with the structure of the Twitter Atom feed displayed.

I’ve maximized my task pane for this screen shot in order to show you how the SharePoint Designer data source displays the entire structure of the feed. Notice the folders and item scrolls for the various elements. The Twitter Atom feed is a "hierarchical" data source. This means that the data has nested, potentially (and in this case, actually) repeating, elements, which in turn may have their own nested elements.
For now, the primary entity we are interested in is the "Entry" folder. Look at the screen shot to the right. Highlight the elements in the "Entry" folder as shown, and select "Multiple Item View" from the "Insert Selected Fields as…" menu. (Yes, I know. It looks like a button, but trust me – it’s a menu!)
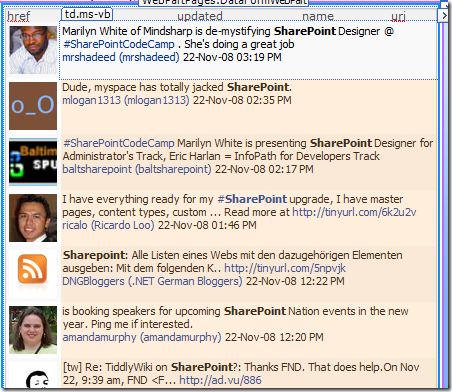
A table will be inserted into the web part. That’s got most of the information we want, but it isn’t terribly pretty. So, let’s fix it up!
The first column contains the "href" entity. Ironically, even though there is a separate entity for the Author, one of the two links listed for each user is the Author’s avatar. The other is a link to the Twitter URL of the tweet itself. For our results, we really only want the avatar, so we’re going to do two things – Change the display to show the image instead of the URL, and hide the other URL.
To change to an image view, click one of the URLs in the href column. To the right will be a little box with a chevron in it:

When you click it, you will have choices to modify the current field. Select Picture.
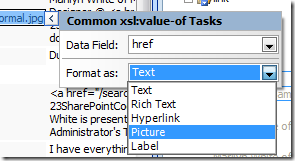
You will get a warning that URLs and Pictures can be dangerous. We know that, so click Yes.
The changes you make here will affect all of the items of that series. (You probably noticed that they were all highlighted in a different color when you clicked on any one of them.)
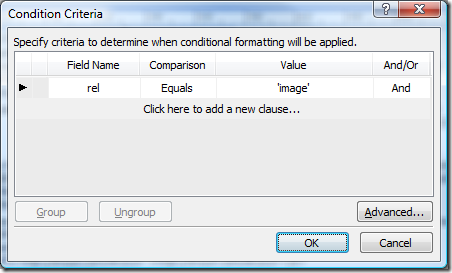
Once you have done that, to suppress the other image (which will show as a "broken" picture), Right-click the broken link and select "Conditional Formatting". In the Conditional Formatting task pane, select "Show Content" from the "Create" menu (another one of those "buttony" menus). In the Condition Criteria box, set the conditions like this:
The broken link will go away.
Next, we want to merge the rest of the cells in the row. This is just like any other table action – highlight the data cells (not the labels) for content, updated, name, and uri. Right-click, and select "Modify/Merge Cells". Now we’re cooking! Just a couple more tweaks, and it will be there.
Select the tweet content text, and change its format to Rich Text (just like changing the image format above).
Select the date, and format it to your regional liking.
Notice that we have a link to the Author, the Author’s name, and the Author’s avatar. Wouldn’t it be great to have the name and the avatar actually link to the Author’s page? Well, we can. If you click the chevron by the link, you will see that the field being displayed is called "ddw1:author/ddw1:uri". For the text, change the format to Hyperlink, you will see the following dialog. You can use the "fx" icons to select the fields you wish to use in the hyperlink, or enter the values manually. In either case, you want the "Text to display" and "Address" fields to be set as shown:
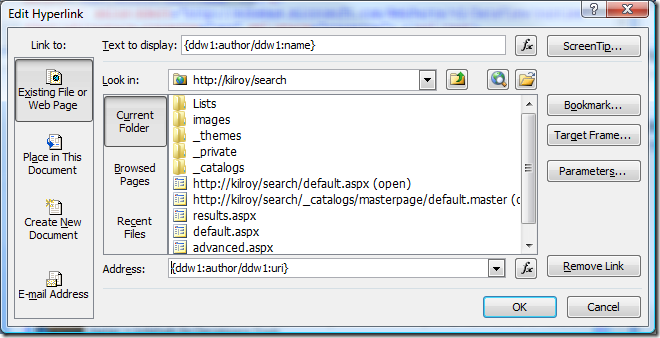
Setting the link on the picture is easy, too. Just right-click the image, and select "Hyperlink" from the context menu. Set the address to the same token as you used above. Now you can delete the field that shows the text of the author link.
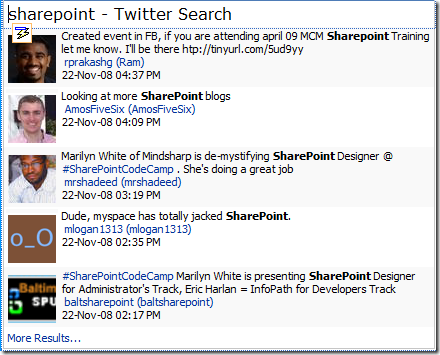
You should now have a web part that looks a lot more like what you would expect from a Twitter search:
Pretty good, but I’m still not satisfied. 🙂
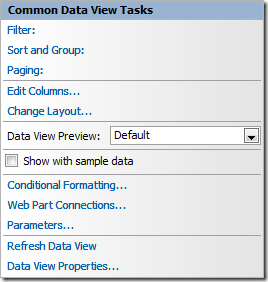
Notice the chevron icon in the upper-right corner of the web part.
If you click it, you will summon the "Common Data View Tasks" menu:
Click Data View Properties. You will get this dialog:
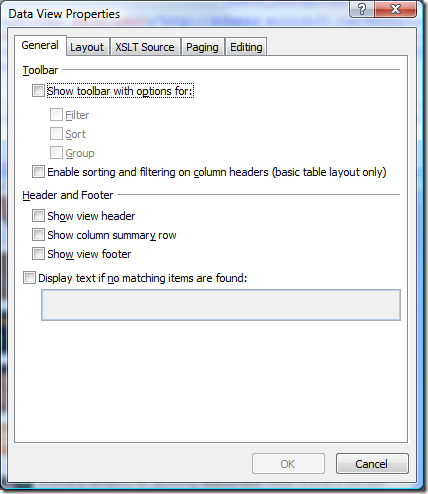
Click "Show view header" and "Show view footer", then click the "Paging" tab.
Click "Limit the total number of items displayed to:" and enter a reasonable number for a search results page. (I picked 5). Click OK.
Display the Data Source Details task pane, and drag the first title field available into the newly created header. Click in the footer, and delete the Item Count. In the "link" group (above the "title" field you just used), make sure item 1 (rel = "alternate") is selected. Highlight the "href" and select "Item(s)" from the Insert Selected Field menu. Change its format to a Hyperlink. Leave the Address as-is, but change the Text to Display to "More Results…"
I’m going to delete the field name row, rearrange the fields slightly, and also apply the style "ms-searchChannelTitle" to the Header cell. This results in a part that looks like this:
Now I’ll make one more change to this web part to allow it to respond to a URL query string. From the Common Data View Tasks menu, select Parameters. You should see this dialog, displaying the "q" parameter that got created when we built the Data Source:

From the Parameter Source menu, select Query String. This will add a field for you to enter the name of the URL parameter you will be passing. The standard for SharePoint Search keyword parameters is "k", so I suggest using this (without the quotes, of course). This allows you to use this web part on a standard SharePoint results page and have it respond appropriately. But you can also then use the k parameter in the query string of any SharePoint page you drop the part on!
Your Twitter Search Results web part is done! You can save the page and close SharePoint Designer.
The Twitter Search Results Web Part in Action!
When you display the page on which you created the Twitter Search Results web part, you will see the default result set:

To show that the URL Query string works, append a "?k=twitter" to the URL (again, no quotes), and hit the Enter key. The results will change to Tweets containing the word Twitter:

Notice also how the search form recognized the "k" parameter, and set it as the default keyword for an internal Sharepoint search…
Now that we know the part is working, delete the k parameter from the address bar and hit Enter to return to the default page. We need to do this because the query string parameter will override the web part connection we’re going to be making. (You might want to keep that in mind, as there may be times you find that behavior useful in your own data views…)
Let’s insert a "form" web part on the page. From Site Actions, select Edit Page. In one of your Web Part zones, click the Add a Web Part link, and select Form Web Part from the Miscellaneous section, and click the Add button:

By default, this form will have a text box, and a "Go" button, and will be called "Form Web Part". On your site, you will probably want to set the web part properties to give it a different label, such as "Twitter Search". For purposes of this article, I’m going move directly on to setting up the connection.
From the edit menu on the part you just inserted, select Connections.

From the fly-out submenu, select Provide Form Values To, and select the Twitter Results web part. You will get this dialog:

Select Get Parameters From, and click the "Configure" button. The dialog will then ask for the Consumer Field Name. Select "q" (the parameter name), and click the "Finish" button.

You can then also exit Edit mode on your page.
Now just enter a term into your form, and click "Go". You will get Twitter Search results for the term you selected!

You don’t need to use a form for the web part connection. You can connect to almost any web part in SharePoint to get query parameters. For example, you could connect to a client list and use the company name as the search term. You could then just click on each client’s record to see their Twitter buzz.
Exporting and Importing the Twitter Results Web Part
Important: Remove the web part connection created in the previous exercise before exporting!
One of the great things about the Data Views you create in SharePoint Designer is that you can easily export them for use on virtually any SharePoint site that has access to the data used to define it. To do this, Use the little arrow in the top right corner to summon the web part menu, and select Export:

A standard download box will appear, allowing you to save the file to your local machine. In our case, the part will be called Twitter_Results.webpart. ".webpart" is one of two extensions you might see when exporting SharePoint web parts. (The other is ".DWP")
So, what do you do with the file once you have it? You import it back into SharePoint!. As mentioned earlier, it doesn’t need to go on the same site – or in this case, even the same server! As long as the server you are installing the part on has access to Twitter, you can use this part.
There are two ways to import the part:
- Directly importing onto a page
- Adding it to the Web Part Gallery
To import it onto a page, start the same way as always: From Site Actions, pick Edit Page. Then click Add a Web Part over a Web Part zone. However, this time, you need to click the link on the bottom of the window: "Advanced Web Part gallery and options"

This will close the dialog and open the Add Web Parts task pane. At the top of the task pane is a menu. Select Import from the menu: 
This changes the task pane to Import mode. From here, you can either type the path to the .webpart file, or use the standard Windows file dialog to browse for it:

Click Upload, and the part will appear on a list below the form. You can then drag it into the Web Part zone of your choice.
The down side of this method, is that you have to re-import the web part for every page on which you want it to appear. Fortunately, you can make it available to any page in your site by adding it to the Web Parts Gallery.
To access the Web Parts gallery: From the Site Actions menu, select Site Settings. On the Site Settings page, you will see the list of Galleries. Click the "Web Parts" link.

Essentially the Web Parts gallery works just like any other document library in SharePoint:

To add the web part, click Upload, and browse to the web part file. After you upload it, you can enter a full description, and determine the context(s) in which the part will be selectable.

Click OK to complete the Save process. From then on, your Twitter Results web part will be available from the standard Add Web Parts dialog box:

Of course, these techniques apply to almost any Data View or Content Editor Web Parts you create, not just this Twitter Search.
You can Download this part here!
http://cid-773832677f575173.skydrive.live.com/embedrowdetail.aspx/.Public/Twitter|_Results.webpart

Woody, nice work here… I think this will provide me the impetus to finally tweak a GPO to "Enable Mixed Content" to my domain joined users’ IE zonal configs. Well, off to create some "no-code" CEWPs of my own! Best, John Wefler
Thanks, John!
This is a killer instructional post. Well done!! I will be giving you all sorts of props in the Los Angeles SharePoint user group tomorrow night when I talk about Twitter for Business. You can see info on that at http://socalspug.org or on my blog http://sharepointstrategist.com. This worked like a charm!
It is very intresting
This is really cool!!!! Thanks!!! very informative. cook-book instructions!!!